|
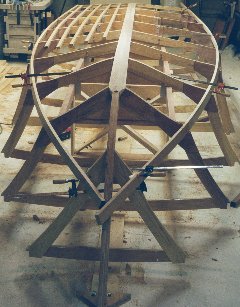
Initial frame assembly on stringers The clamps are holding the frames in position in preparation for installation of the clips that will hold them in place on the motor stringers. The individual frames are held on the stringers with "clips" which may be made of with either wood or aluminum. The aluminum brackets seen in the photos are the motor stringer clips. I used 1.5x1.5x1/8" aluminum angle stock for the clips. The clips are used to fasten the individual frames to the motor stringers. The motor stringers are the long pieces that run the length of the boat on the inside. The bolts are stainless carriage bolts. The heads are pounded down into the holes drilled in the angle stock. This holds them securely and keeps them from turning. The nuts should be acorn nuts to make them "toe friendly". Use regular nuts at first, and then cut the bolts off to correct length for the acorn nuts. The stringer clips should have all edges (especially the tops) rounded over to prevent injury later. Pre-coat the frames and stringers with epoxy prior to assembly. |
||
|
Initial fitting of the chines In this shot the chines are being test fitted on the frames. The next step is to cut the beveled ends on the chines where they meet the stem. Much of the fitting of the chines in the notches is a successive approximation. I started out with relatively square bottom cuts initially and then progressed with greater bevels as each fitting showed the errors. After 5-6 passes the fit was good and the chines were ready for gluing. I used a saw to cut a series of kerfs in
the bottom of the slots and then chiseled out the
remainder. A short stiff saw with teeth that have no set
is best. I used a Stanley "Short Cut" tool box saw. This
saw has aggressive teeth, much like a Japanese styled
saw. No set and very sharp. This does cut on the push
stroke, unlike a Japanese saw. A conventional cross cut
saw is too long, as with it, I am continually hitting
other pieces. The lack of tooth set makes it easier to
get neat sides on the notches. |
||
|
||
|
Next: Long Pieces |
||