| Seating changes
The seats for the first summer of operation were simple plywood benches. Seat cushions were numerous floatation cushions used on the seat bottom and for the backs of the driver and spotter. The seat panels were originally held in place by brass and stainless wood screws. These were countersunk in the surface for comfort and safety. Unfortunately this mounting scheme is not usable with upholstered seats, where they need to be blind fastened from the bottom. The wood screws were also problematic as several stripped out causing the seat to come loose. In addition, they provided a water entry point into both the plywood and the supports. The plywood holes were coated prior to installation, but I think that the localized stress and the installation of the screws broke the epoxy surface and allowed water to enter. Note: the epoxy coated seat surfaces are extremely slippery when wet. I took a hard fall when stepping into a dew covered boat one morning and had several bruises to show for it Currently, the seats have been removed to get reworked and upholstered. The rework of the seats is being done to provide clearance for the upholstery and foam at the edges. The original seat pieces were cut a bit too close to allow clearance for this. The photos are a mix of original construction and current (March 2001) work. The white stuff seen in some of the photos is ice that was found (up to 6" deep) in the bottom of the obat when I pulled back the cover. The commercial cotton duck storage cover is not waterproof by any means. In addition, we had a lot of rain in January and February (unusual for a Wisconsin winter). Snow on the ground around the boat is still 6-12" deep (3/12/01). |
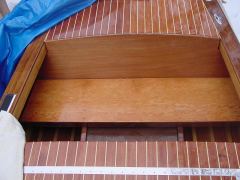
Rear bench seat (origininal)
Front bench seat |
| General seat construction
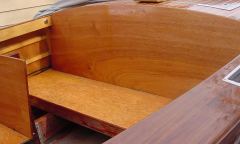
All of the seat positions were tested by mocking up the supports and the seat panels. We sat on them, fiddled with them and sat some more until the heights and angles were comfortable. The seat bottom supports are basically 2x4" pieces. The rear support is laid on its side and has a ~1x1" oak strip (batten leftovers) glued and screwed on top to support the lower edge of the back. The support is placed such that the back bottom is ~1.5" forward of the top. The front edge support is placed on edge and the top edge is beveled to match the seat angle. The front edge support needs to be within 1-2" of the front edge of the seat. If it is placed back further, persons stepping on the front edge when entering the boat may generate enough force to tear the seat loose (yes, it happened). In the upper photo (rear bench seat support) you can see a couple of filled holes in the stringer from the original front seat support placement. The rear support is placed flat, raising the rear of the seat 1.5" above the stringers. A 1x1" piece is placed along the top back edge of the support to hold the seat back. The lower photo shows the front bench seat supports with the seat back back in place. The front supports are fastened to the stringers with "toe nailed" 3.5" stainless deck screws. Note, that there is no need for outboard mounts for the bench seat supports. They are mounted solely to the stringers. |
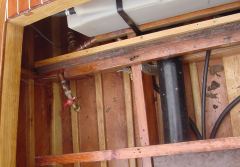
Rear bench seat supports
Front bench seat supports |
| Mounting the seats
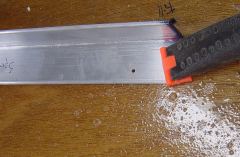
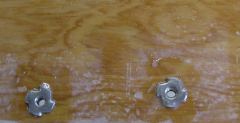
The plywood panels that make up the seat backs and bottoms are held in place by bolts and stainless T-nuts. The T-nuts are mounted into the top surface. The bolt s will pull against the T-nut and the seat will be held down. If the T-nut is mounted into the bottom, the T-nut will merely be pulled out. Since the T-nuts go in from the top, it is important that they are placed and all of the holes aligned prior to upholstering. The panels are test fitted and then marked for stringer and hole locations. The front edges of the seats are fastened to 1.5"x 1.5"x1/8" aluminum angle brackets. The brackets are drilled for 3/8" holes to allow some clearance for the 1/4-20 mounting bolts. The brackets are mounted to the seat supports with 1.5" #8 screws. The T-Nuts are pounded into wet epoxy in the holes. This ensures a good bond and water sealing of the hole. The boards are also touch up coated to ensure proper encapsulation for moisture protection. The T-nuts are cleaned out with a sharpened bolt as shown. Two flats were ground on the end and this was oiled and then threaded in from the top of the T-nut. If this is done within 4-8 hours of gluing in the nuts the excess cleans out easily. |

Seat markings
Pilot drilling of mounting bracket and seat bottom
T-nuts epoxied in place
T-nut cleaner |
|
Bench seats
The seat back is shaped to fit the curvature of the top and under the cockpit side rails. Allow ~1/4" clearance on each side for the upholstery. The seat back is only fastened at the top. The seat bottom panel holds the bottom of the seat back panel in place. I intend to have these seats easily removable to allow engine access (much easier to get to the water and fuel pump than through the hatch). |
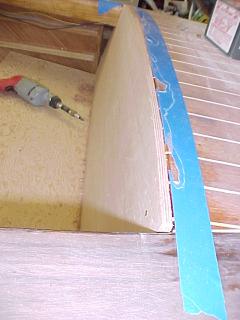
Front bench seat in place. Tape protects deck surface when trimming edge with hand plane. |
| Completed read bench seat
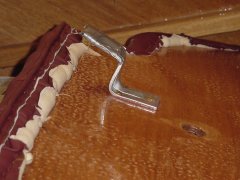
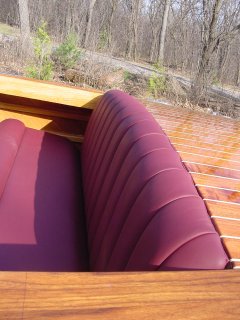
The seats were upholstered by a small local shop. They did a beautiful job. The back of the seat is "tuck and rolled" to create the high tufting. The back has 3" thick foam. The front has 4 and 5 " foam. The front roll of the seat bottom has the 5" foam under it. The rear seat back is held at the top by a couple of brackets that grab under the frame immediately behind the seat. The seat back is tilted into place so that these brackets can clear the frame. This leads to no fastenings being visible for the seat. The seat bottom holds the seat back in place as well. It turns out that for the bench seats no rear fastenings were needed where the cushions meet. They wedge each other into place. The top edge and the front edge are fastened down. The backs are installed first and the bottoms are then pushed firmly into place. The foam is compressed ~1.5" as the seat bottom cushion is slid into place. The seat is then bolted in from the bottom.
|
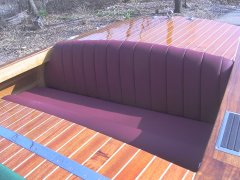
Rear seat in place
Rear seat bracket -- top driver side corner |
| There is a small strip of welting at the edge of the seat
where it meets the deck to fill the gap. It is barely visible in the
photo. The welting prevents to much water from getting in and provides a
finished edge, filling the gaps between the cushion back and the
decking.
The seats are covered with Allante #42551 burgundy vinyl. It is extremely soft and has a leather look and feel. It is also not very slippery when wet. Very nice to step on when getting out of the water, without fear of falling. |
 |
| Next: Driver's and Spotter's Seats | |
| Home |
