I have made a number of beds. The design and construction techniques have evolved along the way to simplify the joinery, minimize fit-up trimming as well as sanding of the finished joints. This is while retaining the strength of mortise and tenon as well as frame and panel construction techniques.
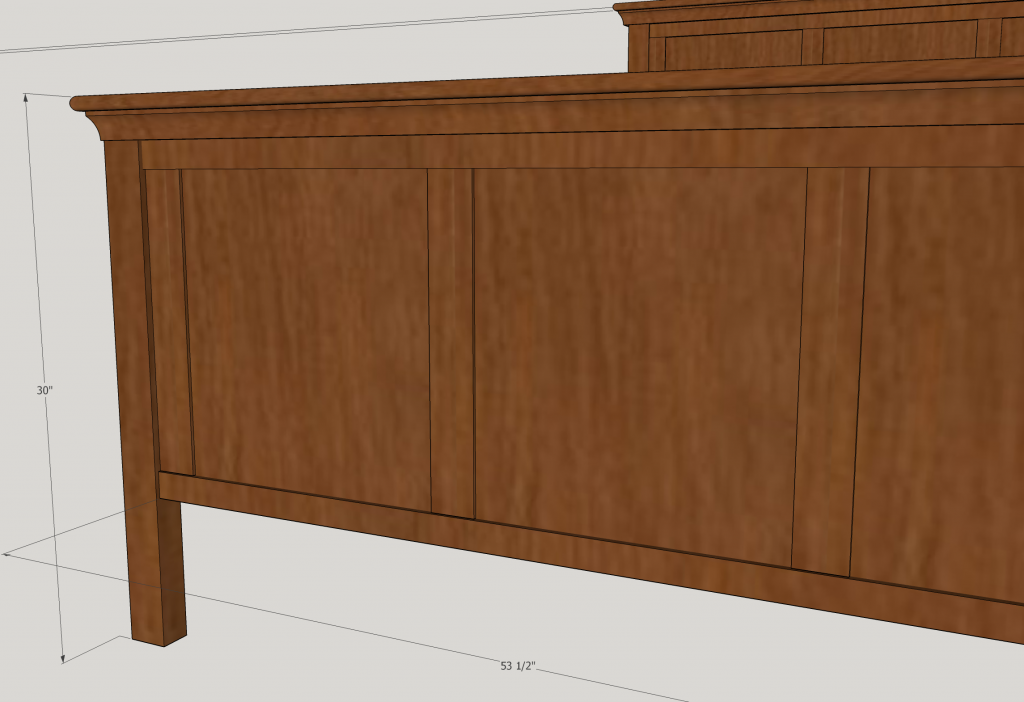
One of the key design elements is the use of offsets or reveals between pieces. For all of the joints (except the top molding), the adjoining pieces are of a different width or thickness. This means that there are no flush adjacent pieces to sand flush to each other, which is a pain when the grain runs at right angles in the pieces of the joint. As you can see in the close up rendering below, the edges of the legs, horizontal rails, vertical dividers / stiles and the flat panels are all offset. Not only does this simplify the glue up and sanding, it adds visual interest and shadow lines.

Another design feature is that the joints are centered in the stock whether this is for the mortises in the legs, dadoes in the rails and dividers or the tenons on the rails and dividers. This minimizes the time spent in set up, and avoids errors / confusion in mixing up dimensions on the various pieces (notably on the legs).
A more subtle design element that saves a lot of setup and worry is using vertical dividers on the ends to hold the panels in place rather than having to make a stopped dado in the leg vertically (and have it align perfectly with the mortises and tenons of the rails as well as the dadoes of the dividers.

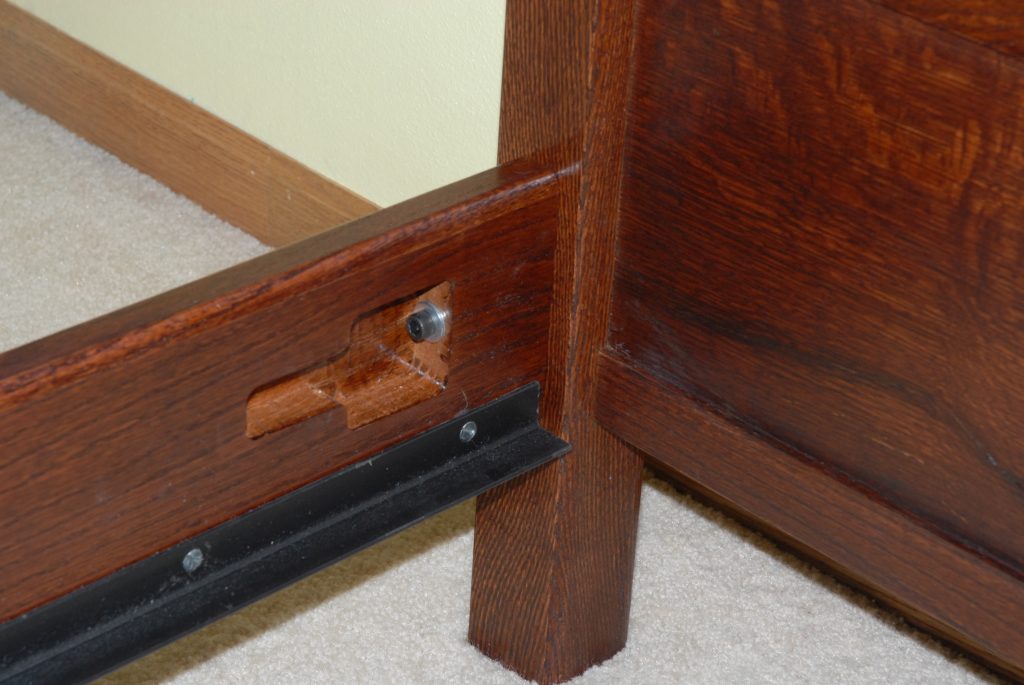
The side rails are fastened with mortise and tenon as well as a buried nut plate in the leg that is used to hold the single socket head cap screw at each end of the side rail. This method has proven to be robust over the years.
Another aspect of the design is the efficient use of materials. As you can see in the rendering the inside width of the foot board and headboard is 53.5″> One of the goals is to be able to rip the plywood panels for the head and foot board from the width of a sheet of plywood. The width of the dividers is somewhat arbitrary but the difference between having 2″ vs 2.25″ wide dividers is the ability to neatly get the 3 panels form the width of a sheet of plywood or requiring twice as many sheets of plywood and ending up with more large scraps. Given the huge increases in plywood prices this year this was increasingly important.
The dados for the panels are 1/2″ deep by a bit under half inch wide, to match the width of the plywood. I use 1/2″ dadoes rather than the 3/8″ commonly used for frame and panel doors to provide added strength and room for adjustment. The panels are cut 1/8″ under size in each direction to make for easier assembly.
The molding under the cap of the head and footboards is the only place where adjacent pieces are flush.
Using these design techniques allows for the ability to “finish first” and assemble later as I did on the craftsman style beds. This avoids a large amount of tedious sanding and there are no places where glue squeeze out can ruin the stain. I will probably do the first several coats of finish on the pieces prior to assembly on this bed and then spray the final 2 layers of finish after assembly. We have done the finish first and assemble last for several projects. The biggest of which was my craftsman style bed. The video of that assembly is shown in the video at: