The seemingly boring part of the project is preparing the stock. This includes cutting to rough length, jointing the faces, planing both sides, jointing a clean edge. Finally, ripping to width and cutting to length.
Some of the steps desire more attention than they are commonly given. With rough sawn lumber, you need to surface all of the sides and will encounter warps and twists. As you sight down the boards, these are most commonly seen near knots or the twisted grain that was near a knot. If you want to maximize your usable lumber size and avoid as much unwanted movement (warping) as possible in later stages, the pieces need to be cut to rough length first. You don’t want to end up with a bunch of 2 foot sticks (and lose wood to jointer and planer snipe), but with careful selection you can often avoid losing 1/2-1″ of usable width and easily 1/4″ of usable thickness. This is due to the rough planks simply not being perfectly straight and flat.
I start by looking for the pieces that I need for the longest sections. In the case of the bed this includes the side rails, head and foot board cross rails and the legs. I look for clean sections of wood that will accommodate these pieces in length and width and for those most visible also having pleasing grain. I look for splits and knots to avoid and leave a few inches of excess length and crosscut. This leaves a stack of random length boards that are ready to head to the jointer.
On the first face passes through the jointer you need to look for: 1. warp / cupping along the length 2. twist of the wood (basically diagonal corners touching the jointer bed 3. grain direction to avoid tear-out. Like many others (and many articles on planing), hate having grain tear out but it really does not matter, if you cannot first get a straight and flat plank.
When dealing with cupping, if you start with the cup side facing up (ends high , center low), it is very difficult if not impossible to get a flat face. The natural tendency is to press near the cutter head and this will allow the ends to float and the cut then basically follows the cup of the board. So you must start with the cupped face down (ends in contact with the planer bed and the bow arching up in the middle) . Now the ends can be taken down and in the last passes you get a smooth flat pass along the length of the board.
Twist is a bit more difficult as it is hard to say which side should go down and it is still easy when passing the board over the jointer head to have a smooth but twisted face. I will often start by choosing attacking the corners that elevate the board off the jointer bed. Mulitple short or partial passes are made on each end to take out the twist. The goal being to get the entire end in contact and eliminate the tendency for the plank to rock side to side. I hit the leading edge / end first and then the trailing end. If you are not comfortable doing this on the jointer or your jointer bed is short, then using a hand plane or power plane will can then be used to take out these high points. Then go back to running the whole plank over the jointer
I was fortunate to be able to pick up a big old Jos. Colladay jointer to refurbish and realign a number of years ago. This beast offers a 16″ wide cut and weighs around 1000 lbs. A previous owner had replaced the head and re-poured the babbit bearings (incorrectly). I was able to realign the knife head to the infeed and outfeed tables, restoring its accuracy and also replaced the motor. Now at 140+ years old it is still going strong. I also outfitted it with a power feeder which helps to achieve a cleaner cut and keep my fingers further from the cutterhead. The power feeder can also be moved to use on the tablesaw and router table.

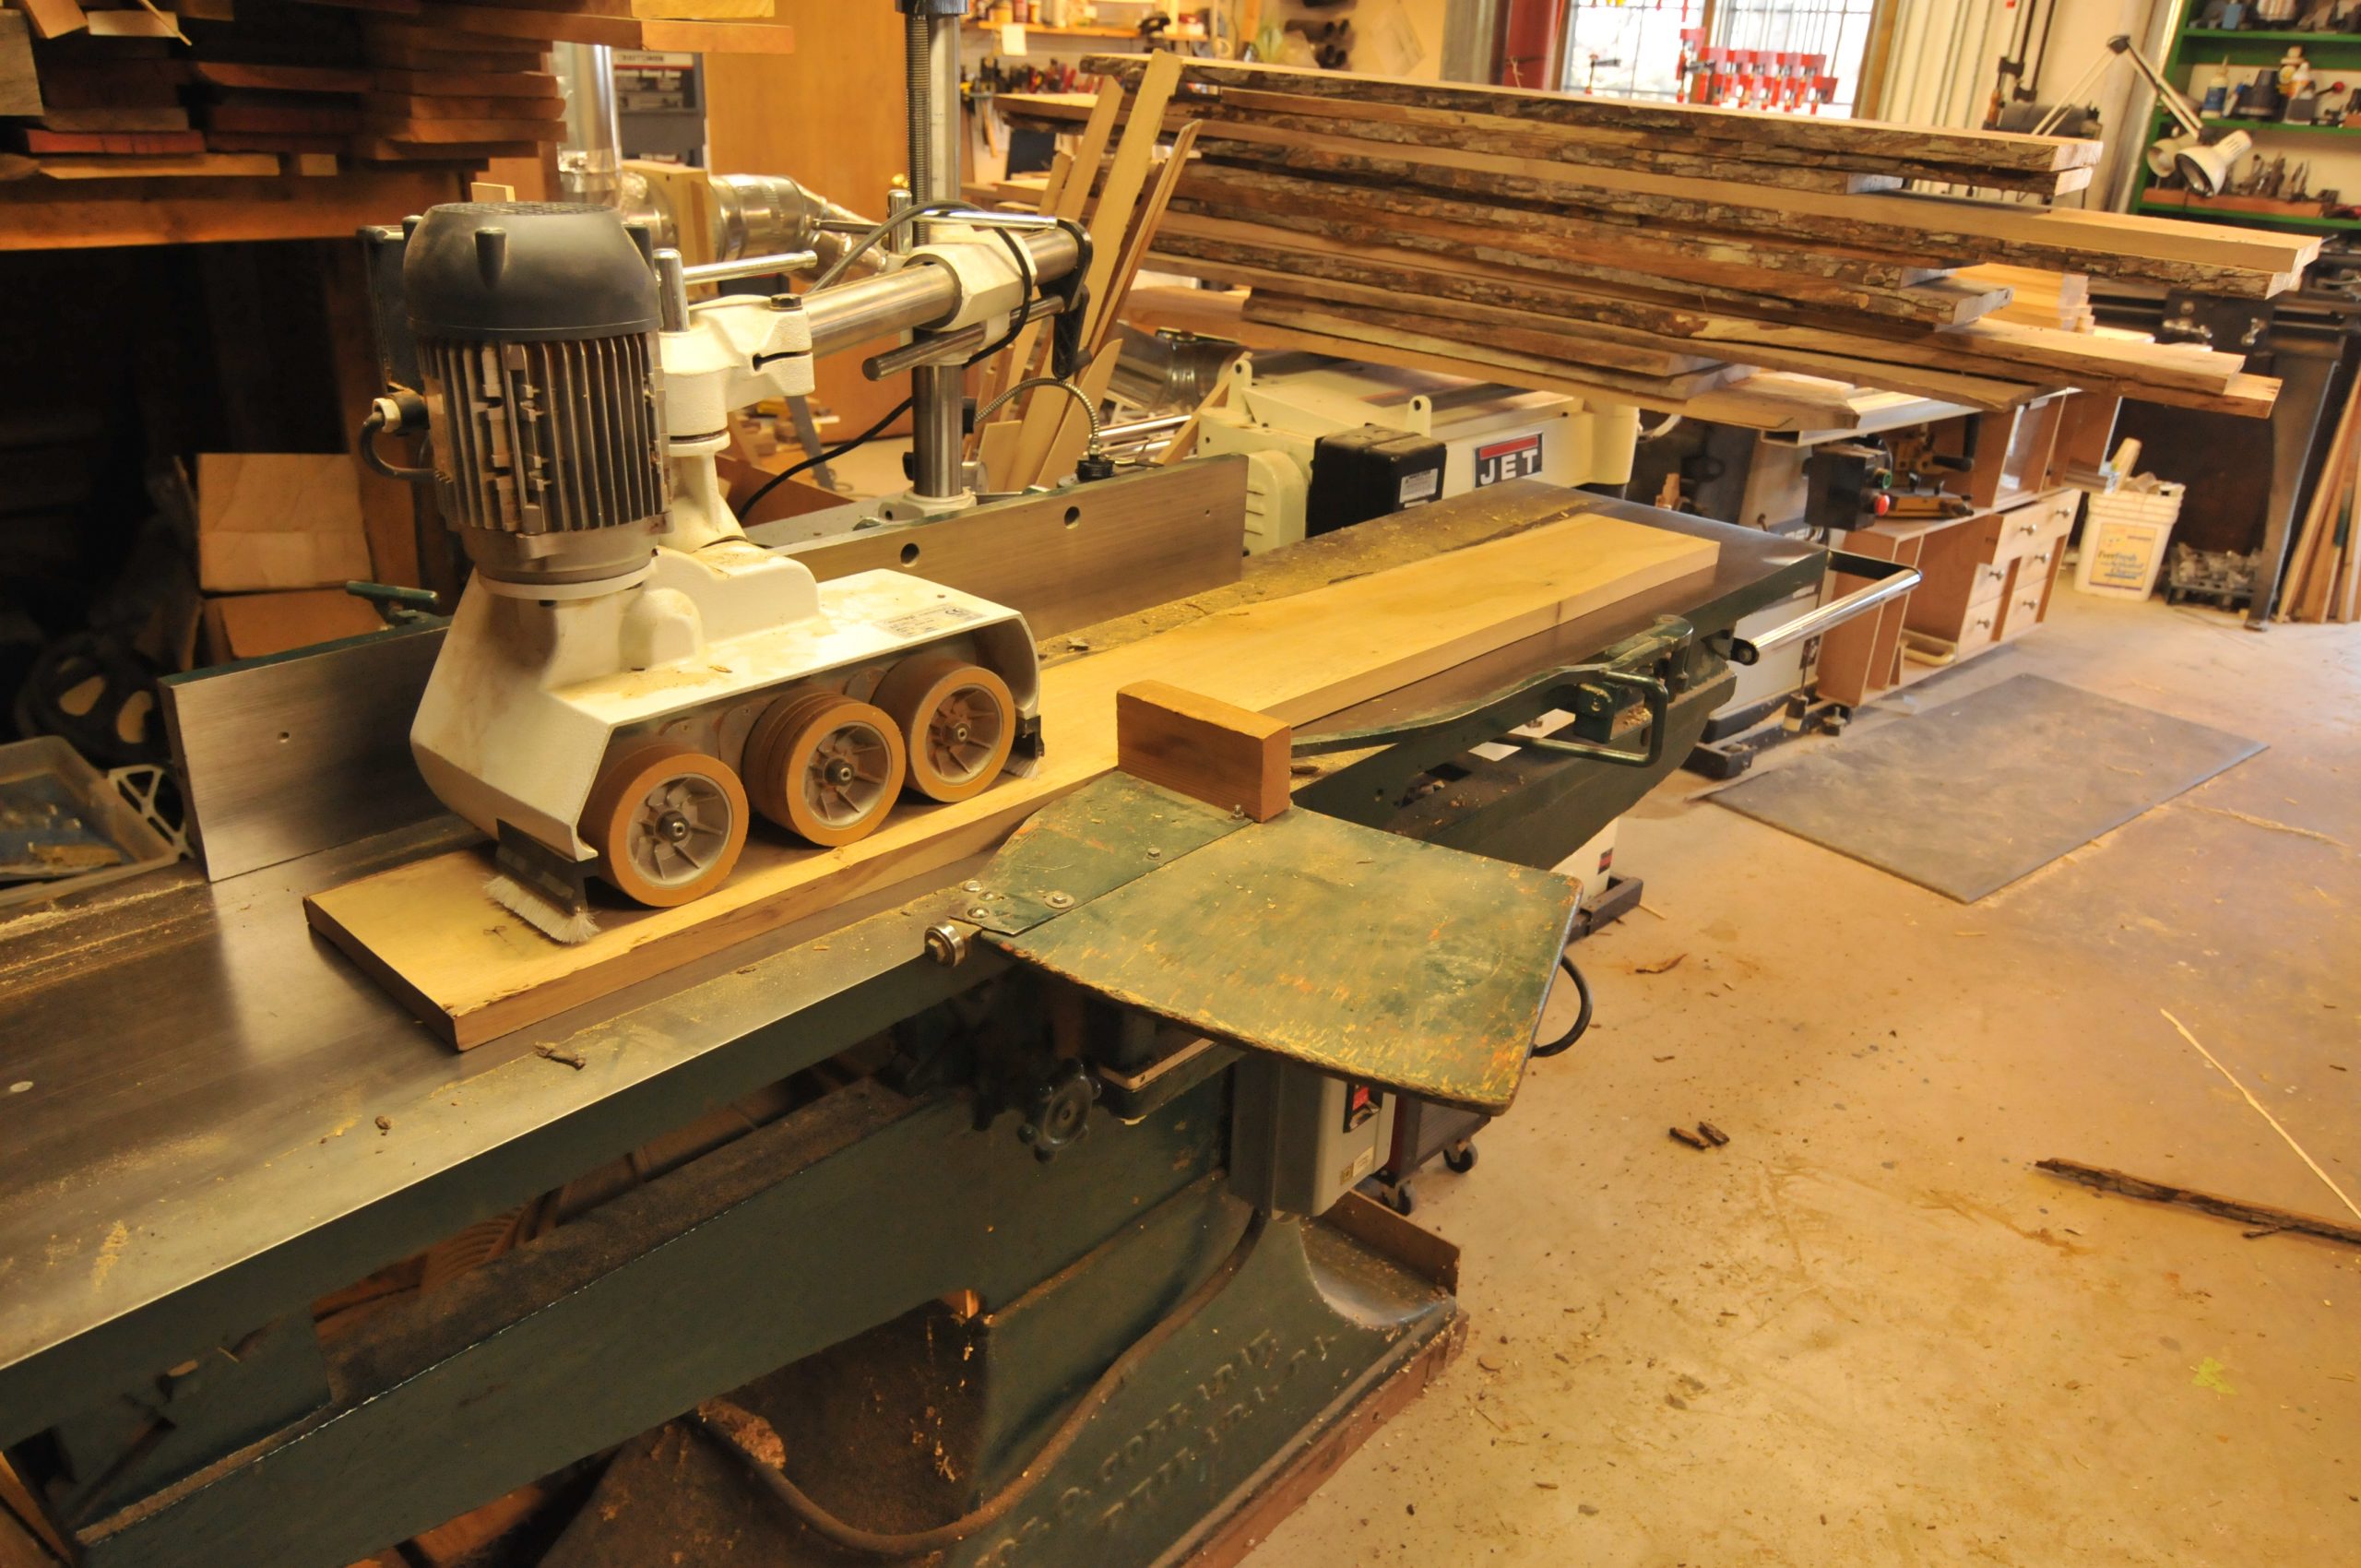
Now that one face of each board is flat, it is time to feed them through the planer. The planer is a Jet 20″ 2 speed This is done in batches for each major thickness: 8/6, 6/4, and 4/4 stock. For the final passes of each size the planer bed is locked in position and slow speed feed is used. For the later steps, it is crucial that all of the pieces of each thickness are EXACTLY the same thickness. IOne of the problems with many planers is “snipe”, that is the cut is a bit deeper at the beginning and end due to slight tilt of the cutter head as the stock is fed in and it exits out. Teal (my ever loving shop helper) is catching the pieces as they come out of the planer. One of the steps to avoid planer snipe is to feed the pieces in with the ends abutting or overlapping side to side. At times, she thinks it feels like the Lucy Show Chocolate Factory episode where it is difficult to keep up with the material coming through. One edge is then jointed and the pieces are ripped to width on the table saw and cut to length on the 14″ radial arm saw . With the stock properly properly prepped we can now proceed with the joinery.
My favored technique for many pieces of furniture and especially beds is mortise and tenon joinery. It is strong and relatively simple to do for the repetitive cuts that are required. The starting point is the mortise as it is much easier to fit the tenon to an existing mortise than the other way around. There are many techniques such as: drilling and chiseling, template or jig routing, using a hollow chisel mortiser or CNC router. I have used them all. For many pieces of furniture and earlier beds, I used the hollow chisel mortiser as it provides a reasonable trade-off of cost, time and accuracy. However as hard as I try, the mortise edges are not perfect and a bit ragged, which leads to a lot of chisel work for clean up. For this project, I wanted to further exploit the use of the CNC router. However, some of the the mortises are quite deep 1.25 to 1.5″. I had previously ordered some extra long carbide end mills (1/4, 3/8 and 1/2″ x 4 ” long). These were the key to being able to do the deepest cuts.
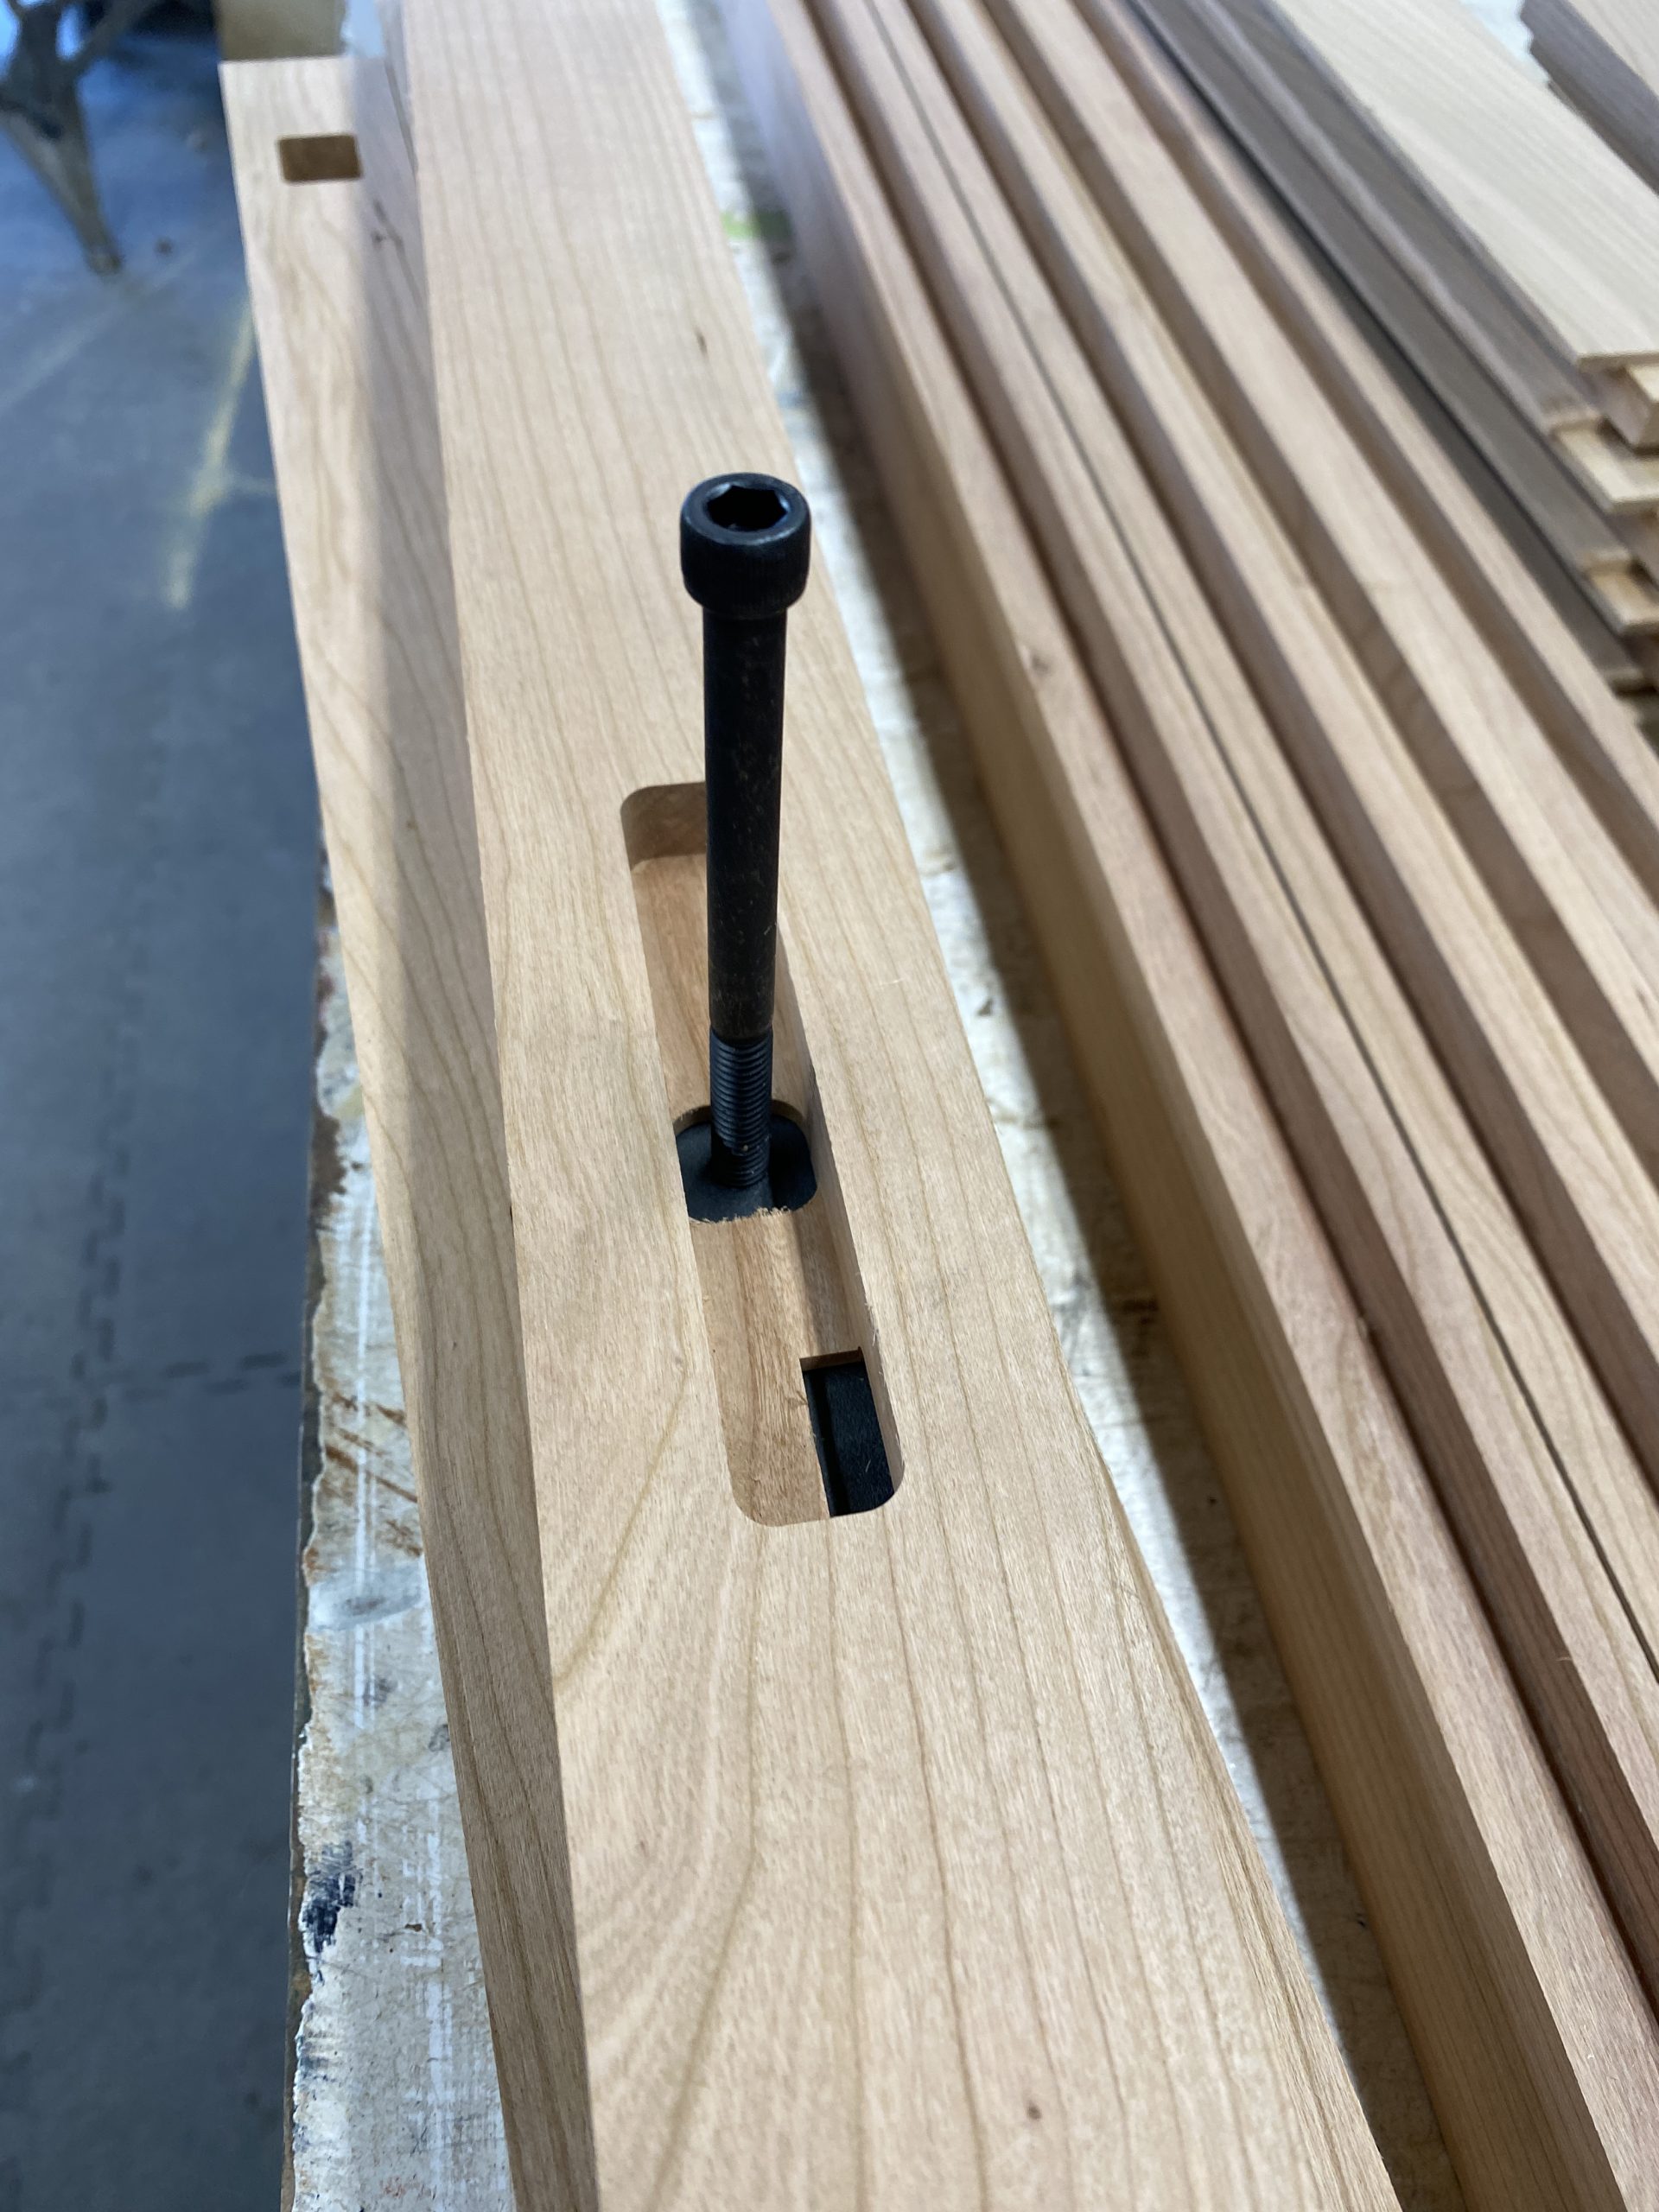
There a re 2 sets of mortise cuts on each leg. The cross rails for the front facing ends of the headboard and footboard require deep roughly 1″ square mortises. Additionally there is a deep 5/16 ” wide x1.5″ deep x 4″ long mortise for the “nut plate” that is buried in each leg that is used to fasten the side rails. On the faces facing the middle of the bed there is a 3/4″ x 4.5″ mortise to receive the tenon for the side rails. The first set of mortises shown below went fairly well. However, as it was cutting I could hear chatter of the router bit and the chatter is evident in the roughness in the corners (still far better than other methods). I shortened the bit up in the collet reducing it stick out of the bit to the bare minimum and increased the spindle speed and the chatter disappeared. The chatter on the wood is not that bad, but my major worry was destroying $40 end mills and having shrapnel flying around the shop.

Here are the legs and rails after all of the mortises have been completed.

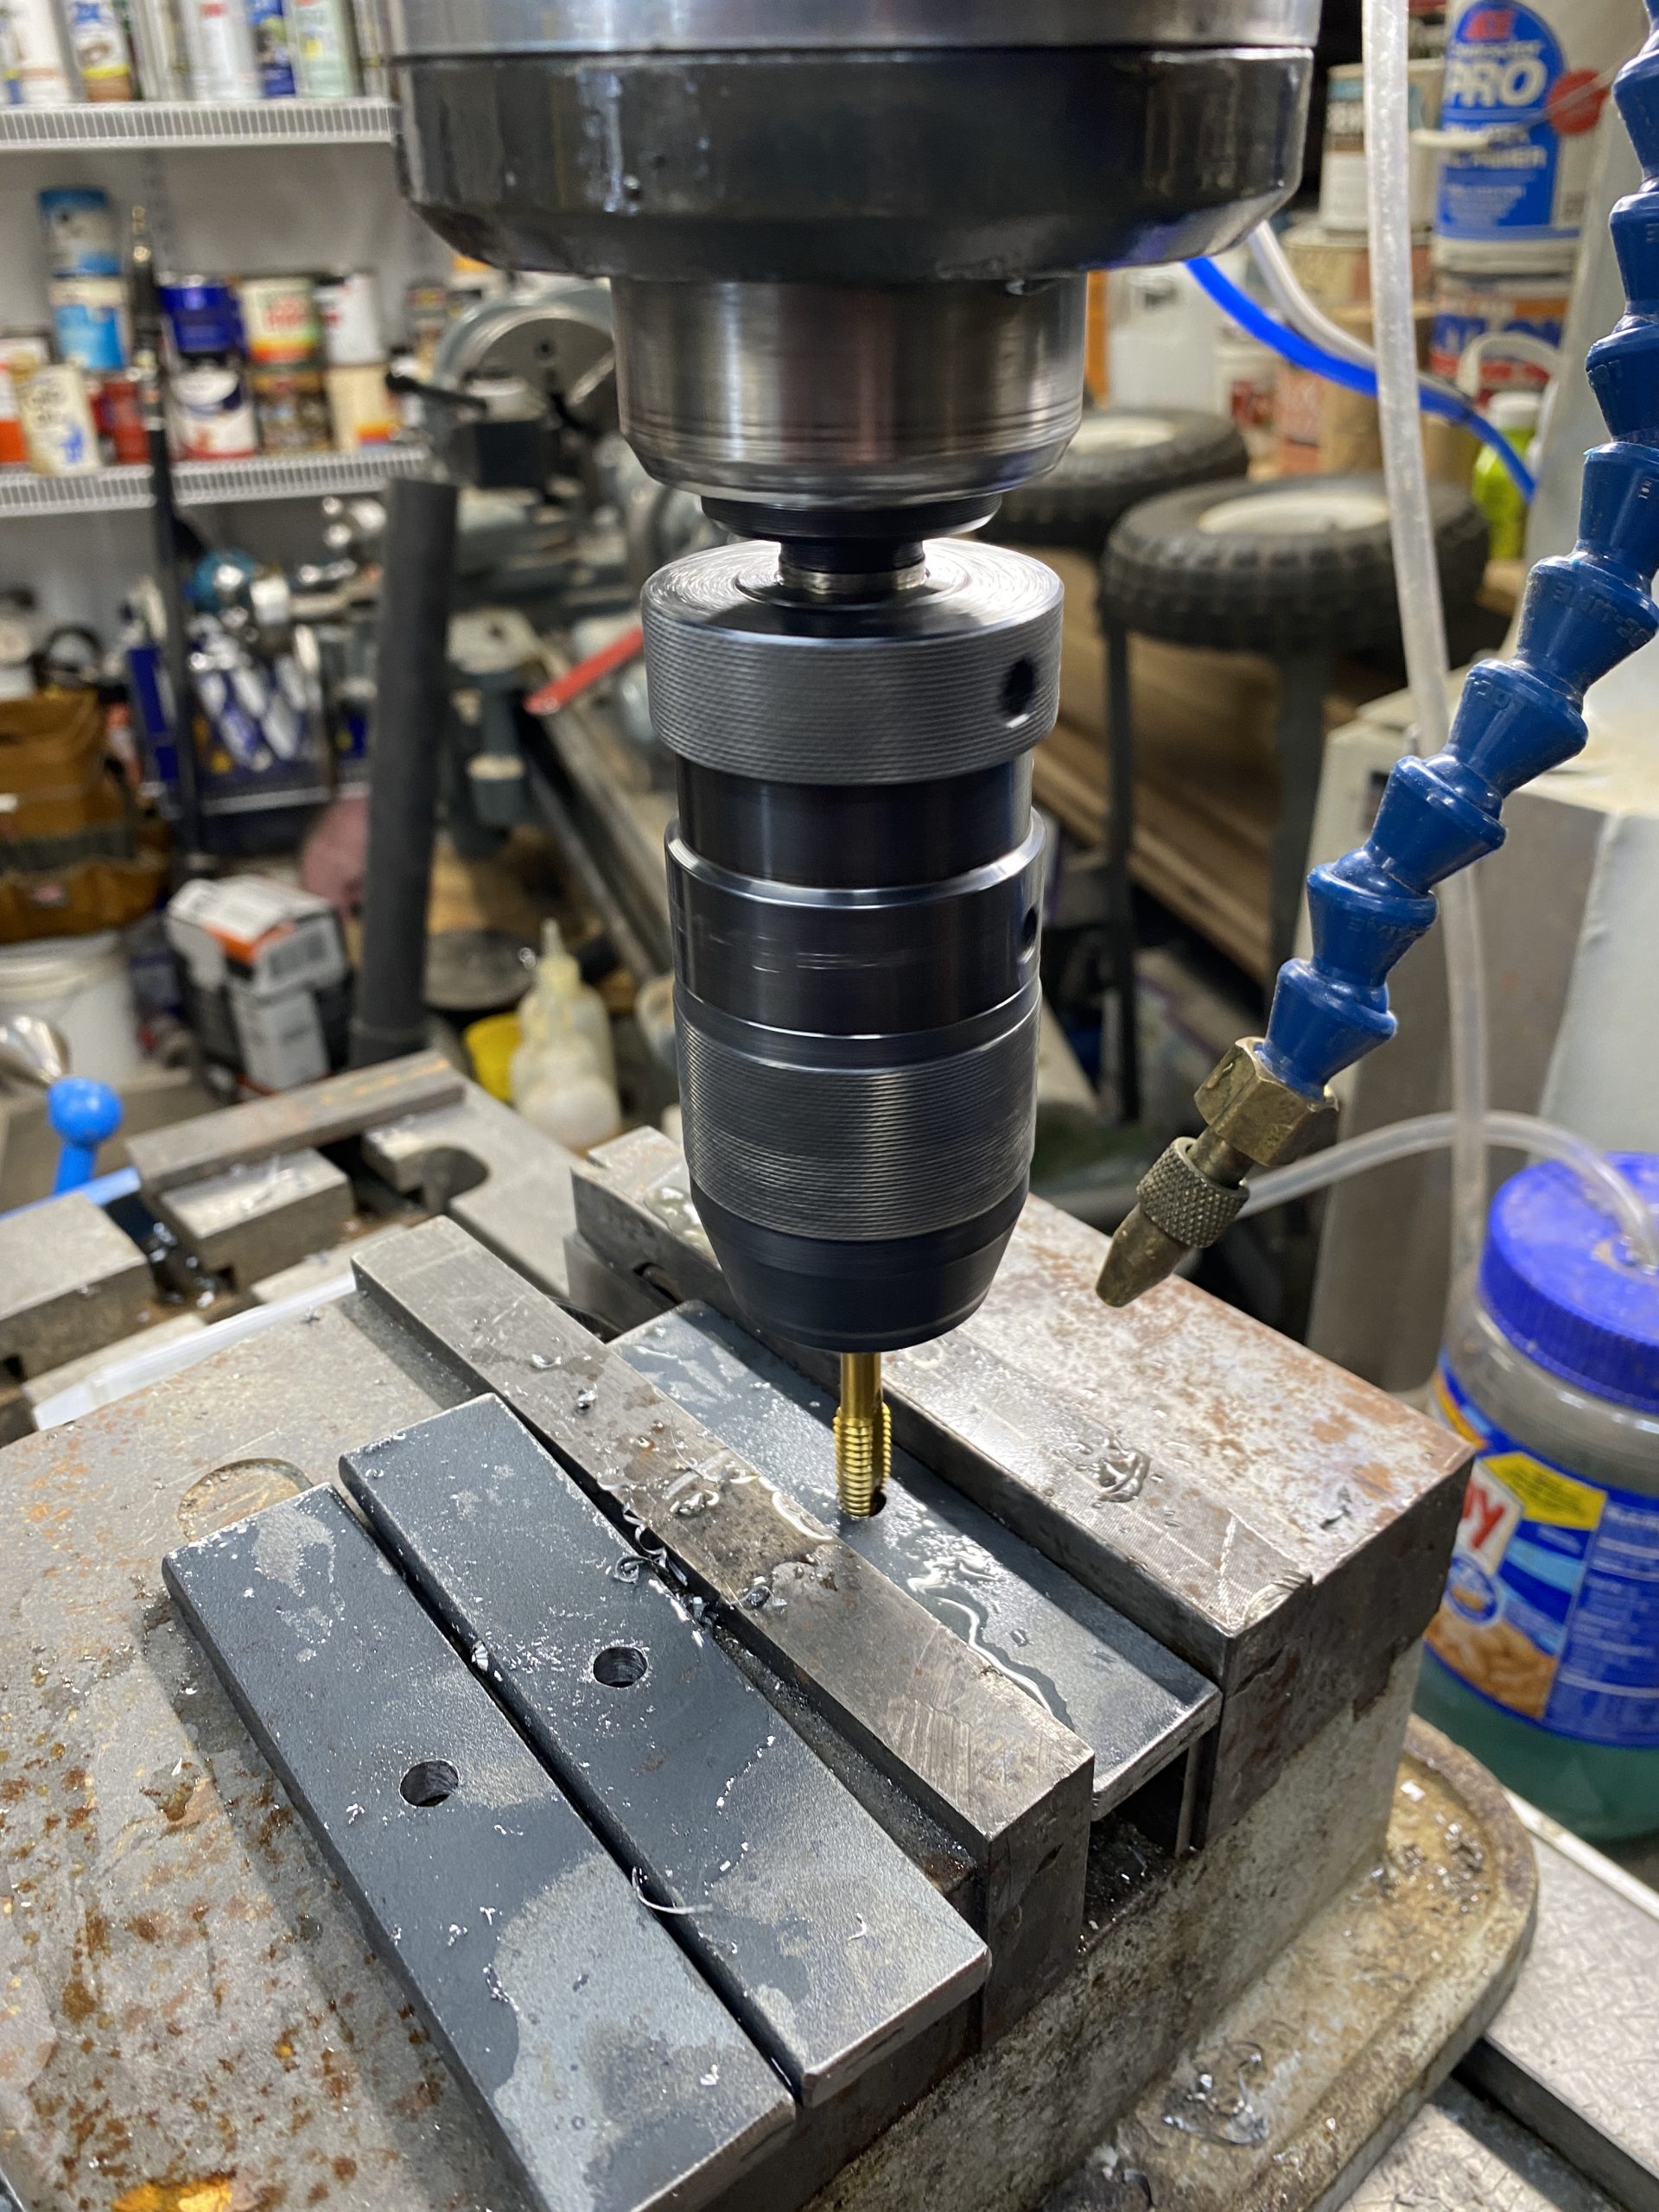
With the mortises cut it was time to fit the “nut plates” that will be used to anchor the side rails to the legs. The nut plates are made from 1/4″x1″ hot rolled steel cut to 4.5″ long. The plates are drilled to ~1/8″ for the pilot and then an F drill. Then tapped to 5/16″ -18TPI. This can be done on the drill press and then hand tapped. I prefer to do it on the Bridgeport Mill for both the drilling and tapping. The stock is clamped in the vise on 1″ parallels to provide clearance below the stock and avoid damage to the vise, drill or tap. After drilling, the mill is switched to the low speed range and the tap is placed in the chuck. The mill is started and the tap is fed into the work. Once the threads are made, the machine is reversed to back the tap out. For both drilling and tapping, a Koolmist spray is used to lubricate and cool the tools. I have the spray set up to automatically come on with the mill motor. For through holes such as these there is the option of using a “gun tap”. This style tap pushes the shaving down and out the hole ahead. This is necessary for good power tapping and avoids having to clean out the threads of the tap after every hole. These can be purchased at machine tool suppliers or amazon and are not available at your neighborhood hardware store or big box home improvement store.

The nut plate can be inserted into the legs and the 4″ socket head cap screw inserted that will be securing the side rails
At this point it is time to start on the tenons and the cross rails. That will be covered in the next post.