| Sanding and Filling Rough sanding was done with a belt sander and 40 grit paper. Just get it close and remove all of the epoxy mess. The belt sander will leave slight ripples in the surface which will come out with the air file. If you gouge with the belt, try to sand it out and fair it out for ~1' all around. Dampen the mahogany generously with water. This causes the grain to swell and closes many of the staple holes. We did this in 3 horizontal bands so that the entire was not wetted and expanding at once. I did not want to push my luck with possible delamination! Let it dry and resume sanding. Most of the sanding was done with the air file (40, 60, 80, 125 grit). The random orbit sander was also useful but does not give as fair of a surface. I used both tinted epoxy and water base (Wonderfill) wood filler. Fill at the 60-80 grit stage and then sand smooth with more 80 grit. The epoxy was a real pain to sand off, but gave the best final results. The Wonderfill sanded easily and looked great until stained (at which time it turned quite dark). Vacuum often. The sawdust will lay in the holes fooling you into thinking they are filled. Chine edges were radiused to approximately 1/4" (6mm) radius. With the curvature of the edges a router is not practical. This was done with a hand plane and 100 grit sandpaper. Make ~ 45° bevel first. Next make light passes to knock off the corners. Finally sand with 100 grit to round over. The edge radius tapers at the bow as the chine "disappears". Final sanding prior to staining was 150 grit by hand lengthwise to minimize the "swirlicues" from the random orbit sander. The mahogany is a coarse grained wood and further sanding is not worthwhile and will actually lead to a more inconsistent stain job due to sanding and grain variations. |

The hull is sanded prior to staining |
| Staining I applied Min-Wax pre-stain conditioner and
Red Mahogany stain. This gives a very even coloring. The water
based filler soaked up excessive stain and is now too dark. The
epoxy filler is a good to excellent match. I pre-tested the stain to epoxy adhesion with wood test pieces as instructed by Gougeon Bro's. Adhesion is GREATLY improved by sanding with 220 grit after staining. Be sure to allow plenty of time for the stain to dry. A week is recommended. Later, when trimming the edges, the fiberglass started to lift. There may be trouble using the stain. Since I did my boat, Gougeon Brothers have run some tests (Summer 2003) with a number of stains and the MinWax stains came out with poor adhesion results. A few other builders have tried the Behlen Solar Lux dye stains with excellent results. Just remember with a dye it will look pretty awful as it first dries. DO NOT fool around with it at this point!!!! It will even out in color and transparency as the epoxy is applied. Practice on some good sized samples to get your courage up. The dye stains are not as colorfast as the oil based pigment stains, but are much more transparent and show off the light refraction by the wood fibers (chatoyance). This gives a much "livelier" looking finish. |
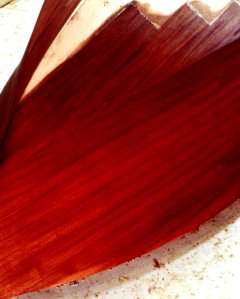
Stained hull with a close-up of the chine joint. |
Fiberglassing the sides The fiberglass was applied and wet out using the "dry" method. This is easier than I expected. Have help for mixing, removing tape, holding tools, etc. You need one person to spread, another to mix and a third to be a gofer. The resin was applied with spreader and roller. This was alternated as the spreader gives even fill and can be used to force the resin down into stubborn areas. The roller was used for spreading on the very vertical areas as well as smoothing out wrinkles. In some areas it is possible to pour the resin on against the spreader or roller. The fiberglass was wrapped up over the bottom and overlapped ~1 " at the stem. For the transom you want your overlap points to be along the rear edge of the sides. In this area it will be covered by the stainless trim strips. If you do the overlap on the transom, it may end up forever visible. The overlap areas will want to lift a bit at the transom corners and stem. Staple it lightly and don't play with it too much. As you play with it you risk squeegeeing out the resin and introducing air into the weave (which will then look milky). As the epoxy starts to cure a bit, you can then stick it down and press out the bubbles. If there are bubbles when you are all done drill them out with a tiny drill and fill the gap with epoxy from a syringe. The Glen-L book and video were very helpful. Everyone watched it and knew what was coming up. This was my first fiberglass sheathing experience and we were all very nervous as we started. The second side was started while the first was still starting to cure. This showed how MUCH, MUCH harder wet application would be since we had to deal with overlapped areas which were still tacky. The final texture after the first coat is that of the cloth, much like a sailboat antiskid deck pattern. If it is too thick, the clarity is reduced due to trapped air (foam) bubbles which gives a cloudy appearance. The only cure for this is to remove the fiberglass in the offending area , so be diligent in spreading. |

FIberglass draped for the sides and bottom overlap and starting to apply resin. |
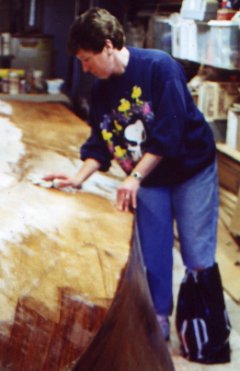
Teal washing off the sanding dust and amine blush. The bag on her foot protects the cast. |
|
Bottom Again, the stick it down when partly cured makes it work. Plan on putting on 2-3 coats during the first day. If you put them on while the prior coat is starting to set up, you don't have to sand or wash. Just keep building up. This way you also end up with a chemical bond between the coats - they really become one layer. 3 coats in 1 day is a MAJOR effort. Everyone will be tired at the end. Plan on a good 10-12 hour day. |

Bottom fiber-glassed and waiting to trim the edges |
| Fill Coats and Sanding Sand only to remove the peaks. Apply fill coats, I needed 3. Now sand prior to painting down to 220 grit. Some slight filling was needed. This was done with epoxy and micro-spheres between the 2nd and 3rd fill coats and then sanded. |
|
| Painting The bottom is painted a dark green, similar to that used on the old Chris Crafts. Since the boat will be trailered, a normal anti-fouling bottom paint was not used. Mask the waterline with good electrical tape for a clean edge. Be careful not to stretch it too much or it may peel when the solvents of the paint hit it and then use masking tape to secure the newspaper for draping. I used a white foam polyurethane roller. It worked quite well. Now ventilation becomes important!. I had put on a respirator shortly after this was taken. The fumes are strong. Using epoxy makes you spoiled. Since we started using the boat, we have been leaving the boat in the water all summer and the polyurethane paint does not hold up terribly well (blisters) when submerged for over a month. One of next spring's tasks will be to use an anti-fouling paint on the bottom. |

Here I am painting |
| Rub out and Wax Wet sand between coats with 320-400 grit. Final coat start with 800 grit and work up carefully. You want to get the paint smooth, but avoid sanding through. Rub out / buff. I did not not have a buffer at the time,so rub out was by hand with rottenstone and water. Final sanding and rub out is 4+hours . With a buffer foam pads and rubbing compound this would go much faster. At this point the finish is dull. I then used Meguiar's glaze applied with a foam pad on the drill. This brought up the shine after 2 hours. Regular auto past wax was then applied. No rub out or wax was done on the sides (including paint). This will get more coats and the boot stripe. I do not want to have adhesion problems. No wax in the areas for the strut and rudder. The exact
shaft hole area has not yet been calculated, so it will be sanded
and cleaned off later. |

Ready to go! |
Bottom Paint and Boot stripe After the 3rd season, it became apparent that with the boat staying in the water all summer, an anti-fouling bottom paint was needed. Additionally, the water line was set a bit low. The varnish or Imron is not made for submersion and will blister if left underwater for an extended period of time. The water line was raised. The height to the top of the bootstripe as measured from the chine is:
|
|
| Next: The Move | |
| Home |
©2000-2005 Mark Bronkalla