We like the flat of the brisket. A full packer brisket like you would get at Costco is just too much for us (and I am no fond of the point). Smaller flat cuts of brisket that are nice and reasonably lean are hard to find and pricey unless you take a look at corned beef.
If you smoke a corned beef straight from the package it will be far, far too salty when finished. The salt levels are high due to it being intended to boil for cooking and the generally high level of salt in commercially made corned beef. There is 3-4 times as much salt in the commercial corned beef compared what you need for it when it is being smoked.
The Cure
There is a cure for the excessive salt in the pre-packaged corned beef. Soak the meat in 2 changes of water for 3-4 days in the fridge. A crisper drawer works nicely. Add the spices, whether the packets that come with the corned beef and / or your own to the second change of water. This will reduce the salt level nicely. The dark pink color will fade to light pink or almost grey. Don’t worry, it will pink up when smoked.
Final prep
Remove from the brine and pat dry with paper towels. Sprinkle with 2 tsp ground coriander and 2-3 Tbsp fresh ground black pepper. You can use more pepper if you like, but my wife does not like “peppery” pastrami. Let the meat come up to at least 45F if not nearly room temp prior to smoking. This avoids getting it “sooty” which happens if cold meat is added to the smoker when it is just getting going.
Smoking
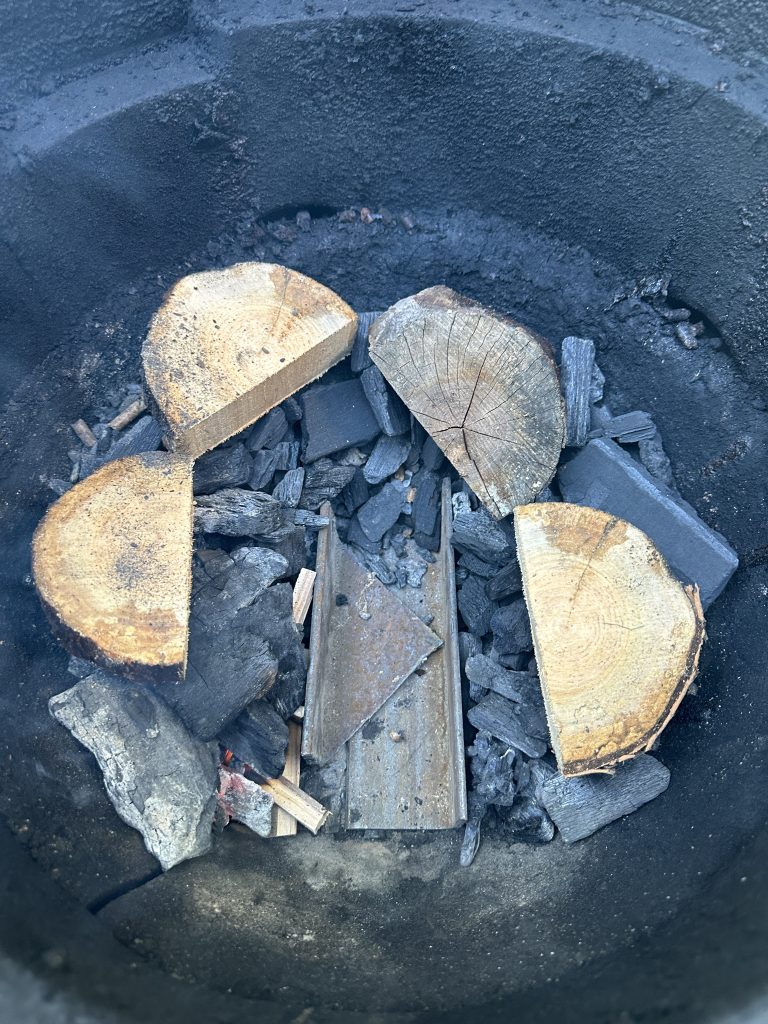
Simply heaping a bunch of charcoal in the grill will mean it is hard to control the temperature as too much will be burning at once and when the fire is choked down it may go out at an inconvenient time such as 1AM. This is not much of a problem in the winter, as I can get up and restart with little worry although the meat may be frozen by morning. However, in the summer, this would leave the meat in the “danger zone” temperatures above ~40-45F for too long and it would need to be discarded if the heatermeter plots show it was cool for too long. It is better to have a serpentine lay-out of the charcoal and wood chunks so that one end is started and it gradually burns in a loop. Using some scraps of 2-4″x1/4″ angle iron makes the separation of the charcoal into a U shape and prevents it from sometimes burning across the gap as I have experienced in the past.

Place the meat on the smoker with the thicker edges out and the thin edges touching or overlapping in the center. In the BGE (Big Green Egg) , place the conveggtor (indirect heat plate) with the flat side down so that you have indirect heat. Place a tray with 2 qts water on it and then the grate on top of the legs. Set the Heatermeter temp for 205F (as measured with the probe clipped to the lid thermometer bracket) or 185 if clipped to the grate with the meat. Place the meat temperature probes in the thickest parts of the pieces and close for the night. Once the charcoal is started and stabilized, I close the daisy wheel vent on top all the way. There are enough gaps for the fan to push the smoke through, especially with the temperature probe wires in place. If you leave the daisy wheel too open and the wind kicks up, the whole thing can runaway and get too hot while you are sleeping.
I typically start at 7 pm for an overnight smoke, so I can get up after dawn to check the meat. For me, this is better than getting up at 2 or 3AM, getting it started and hoping everything will be done for dinner. The smoke comes from the hardwood (oak and hickory) charcoal and several (4-6) chunks of well cured cherry wood (slabs 2-3″ thick by 5-8″ diameter , cut in half). I greatly prefer the fruit woods (cherry or apple) smoke vs hickory, pecan or mesquite which are too harsh for this meat in my opinion. Another option is to add blended wood pellets (apple, cherry, alder) but beware that they can “runaway” and cause the grill to get too hot, especially if there are any fat drips or the wind picks up. Chunks are better for overnight smokes. I have wild cherry and sour “pie” cherry as well as apple and pear trees on my property which yield a nearly endless supply of wood for smoking. A small foil pan on top of the conveggtor, below the meat, holds about 2 quarts of water. The added humidity helps to keep the meat from drying out too much with the long smoke.

In the morning, the meat should be in the range of 150-170F. Edges will be higher and the center lower. I slice a bit on the ends to check for color and flavor. It is tasty but still tough at this point (but great for a breakfast omelet).
Pull the meat and put in a large pot or dutch oven with about 1/2 ” of water and place in the oven at 235F. The meat will be done somewhere between 203 and 206F which should take another 3-4 hours. It should be very tender at this point. Final baking with steam is how the famous delis such as Katz’s do it.
This Batch
I did not have enough fresh charcoal (lots of it was used) in the grill, so the heat after ~1AM was erratic and nearing the end of the supply. So I got up at ~2AM and moved it to the oven to finish. It is nice to be able to check the progress with the heatermeter and my phone from bed. One of these days I will configure the alarm messaging on the heatermeter.

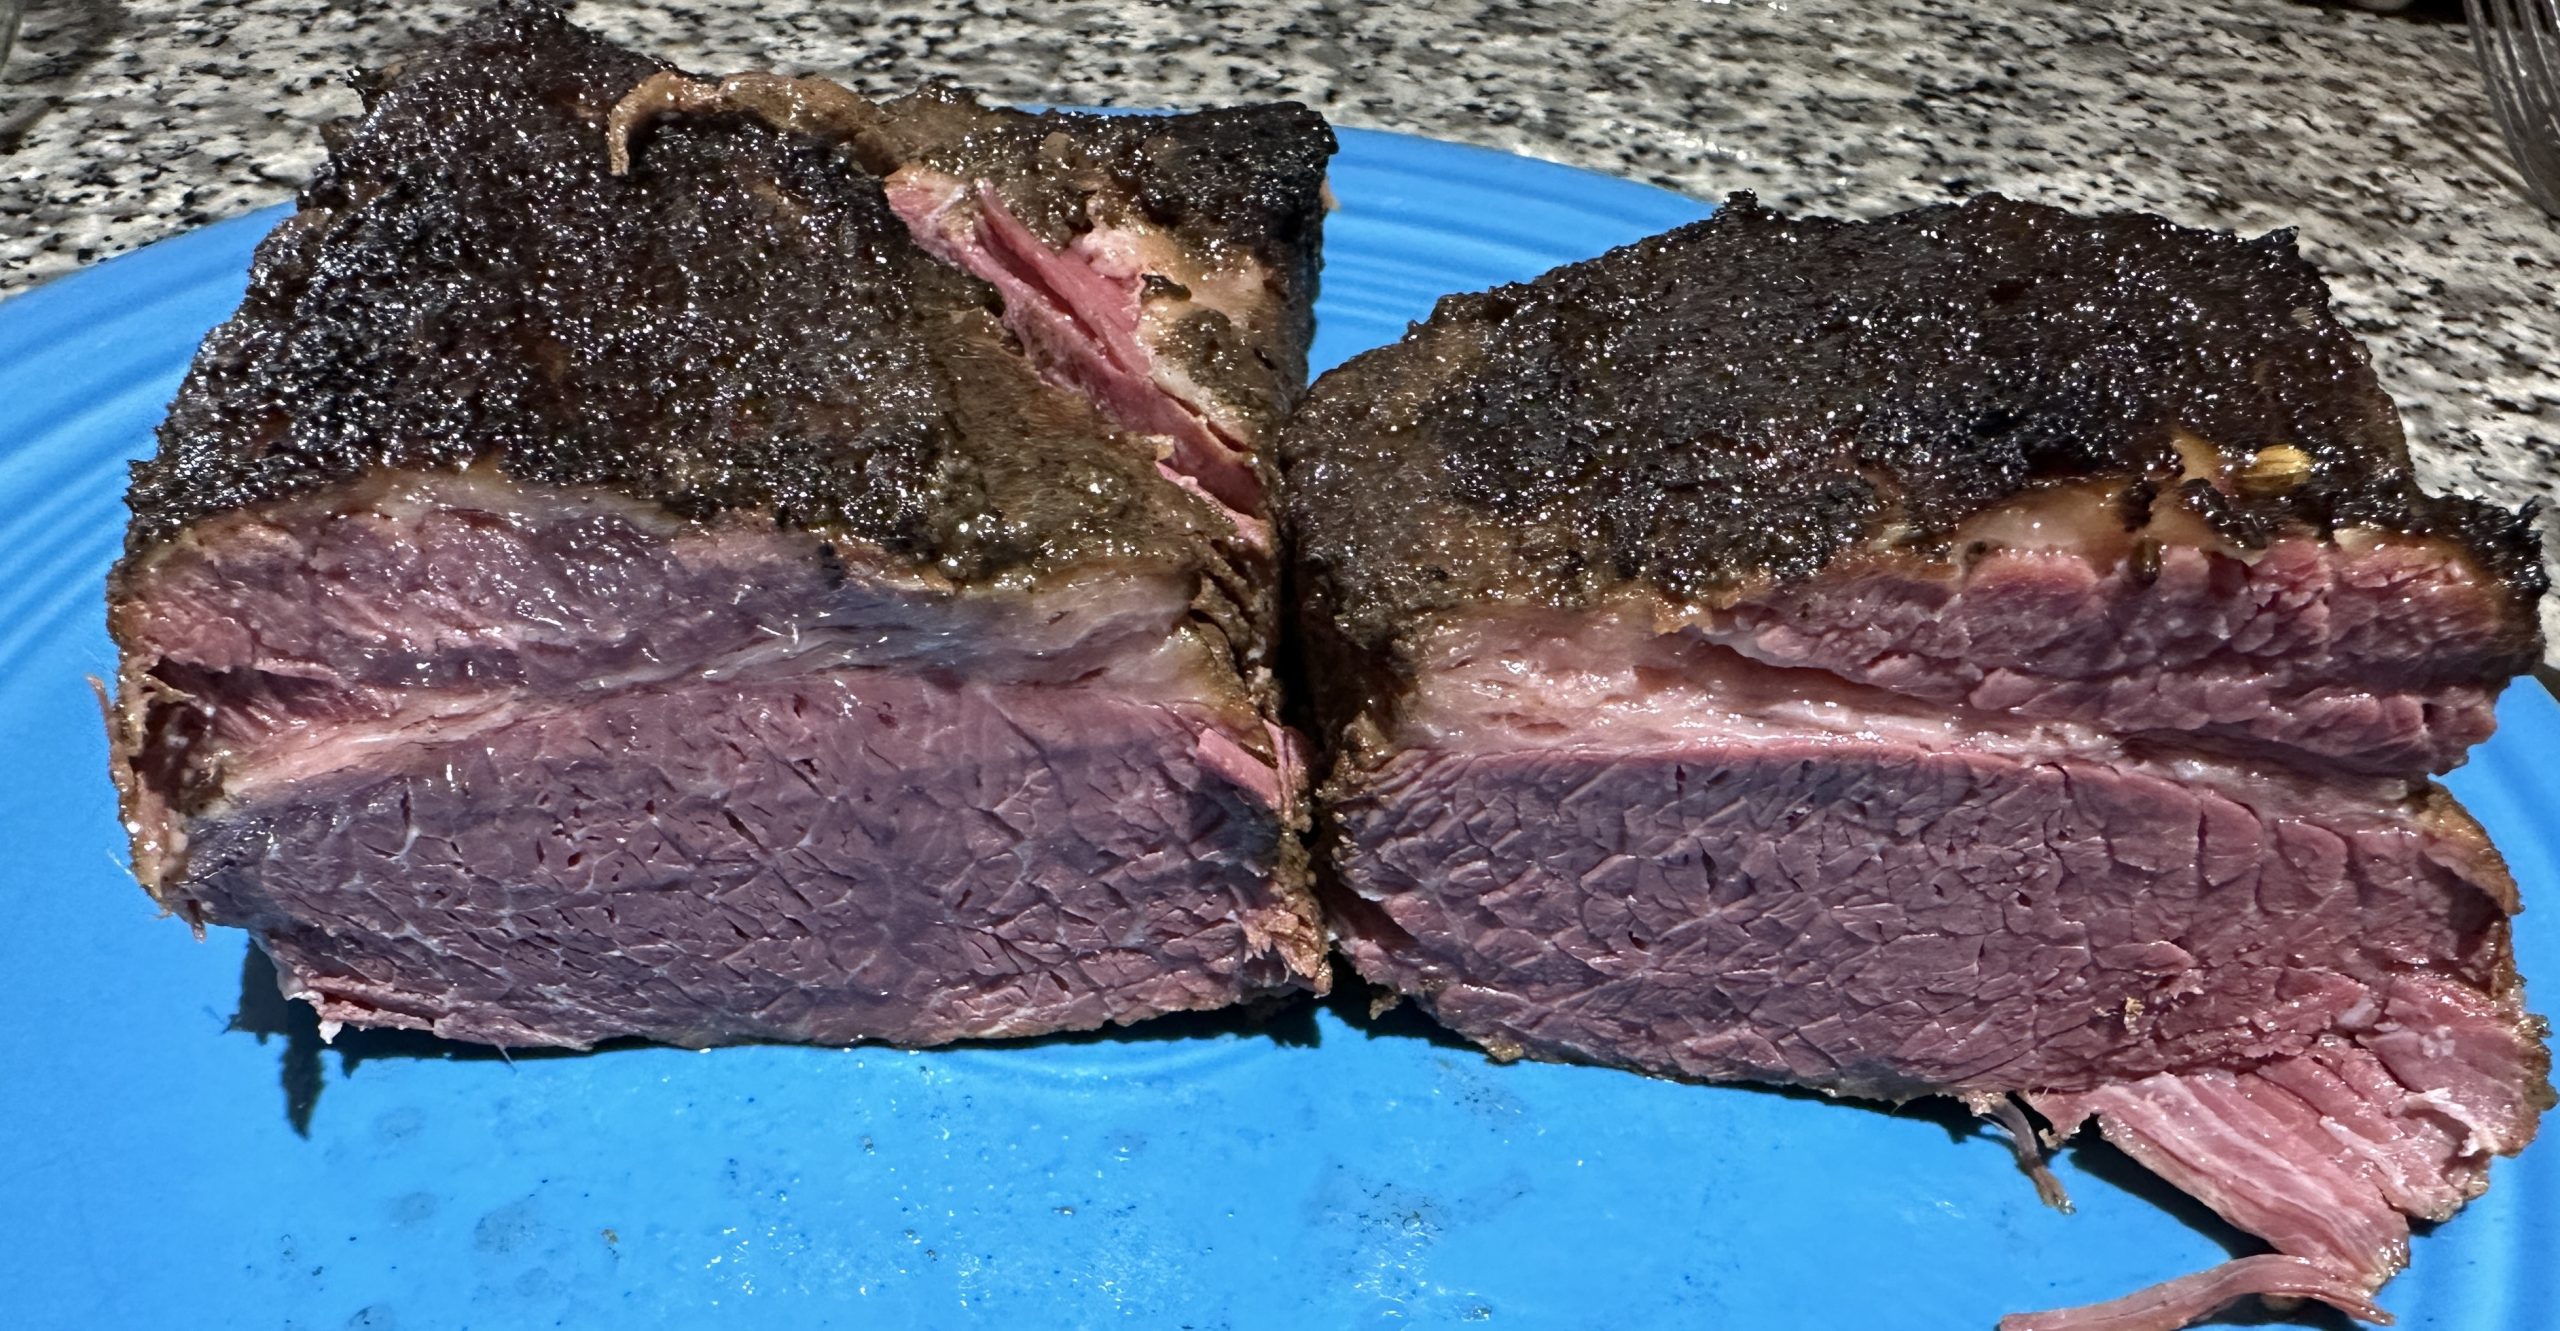
When we got up at 6AM, the meat was ready with internal temp of about 205F. The house smelled so good! Next time I will remember to add all fresh and build up the scrap iron divider taller to hold it back. Overall, the divider which worked well.

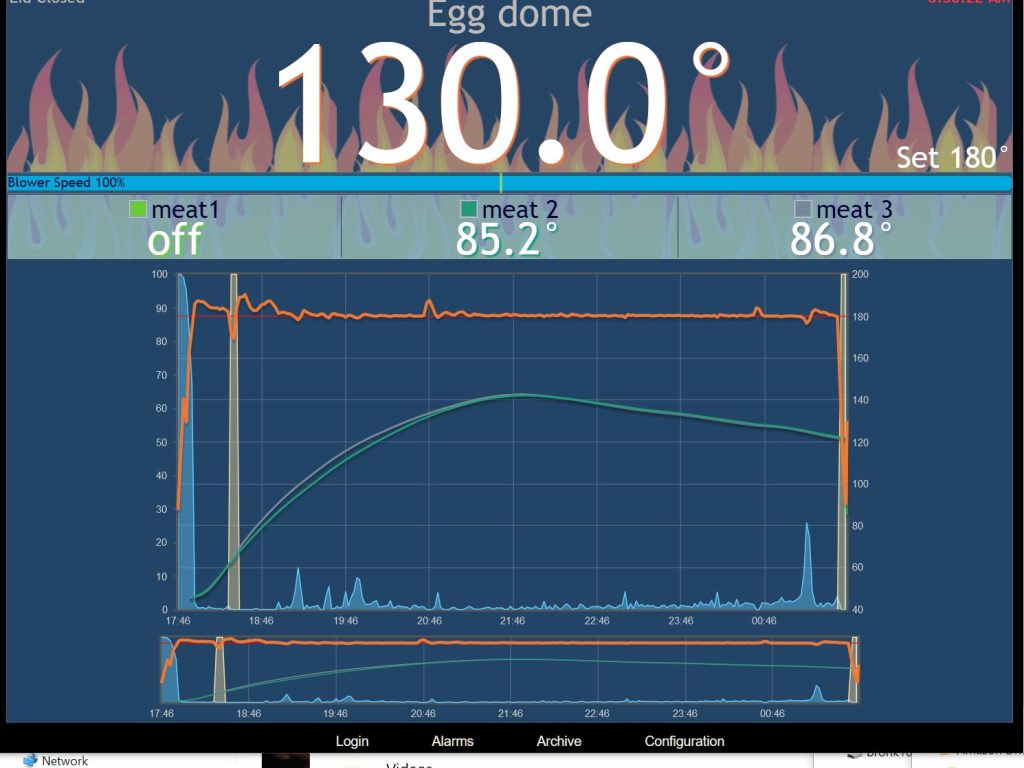
Orange is the grill temperature grey and green are the meat internal temps. Snapshot taken after the probes were removed, hence the low readings for meat 2 & meat 3. I was experimenting with a slightly lower target grill temp set at 180F for this one. Meat came out juicier than normal. I do not have a good explanation for the fall off of the internal temp starting at about 10pm. This is right where the stall (typically 150-155 F) would be.

My wife, Teal really likes the flavor. Reubens for dinner tonight.
