In the course of using the boat, it is virtually certain that over time, damage will occur. A big part of building a wooden runabout is having a floating show piece. Keeping it in near show-room condition takes continual effort and upkeep. Frequent use of our boat and pulling up to other boats or docks in bumpy conditions has lead to some damage. The anchor was also swung into the hull resulting in a dent as well.
The epoxy / fiberglass covering of the hull provides a large degree of ding, dent and scrape resistance. The varnish outer layer provides a final "wear" layer that can be renewed after sanding out scratches and lesser scrapes. The varnish also provides the UV protection for the epoxy and the wood. Damage and repairs fall into several categories:
As you can imagine, the severity of the problems increases, the immediacy of the repair also increases. Water contact with the previously encapsulated wood causes problems ranging from staining / discoloration, to delamination and rot. Scratches in the varnish are not only unsightly, but also lead to long term damage to the epoxy due to increased UV exposure.
Assuming that the damage occurs mid-season and you don't want to haul out or commit a couple of weekends to doing extensive repairs or complete refinishing, the best first step of the first three problems is to recoat the area with varnish. The goal is to fill the scratch, ensure that the moisture barrier is intact and reduce its visibility. Long term cruisers keep small containers of varnish and small brushes on board for just this reason. Even in the third case where a small area has delaminated, but is still basically intact, applying varnish will reseal the surface and prevent moisture penetration.
For major repairs where the fiberglass has been breached and the wood is gouged,
there are again several options. If the damage is non-structural and the area
is painted, you have many options to filling the damage and repainting. We had
a major scrape on the bottom which went through the fiberglass and into the
plywood. This was able to be repaired to the point of invisibility in only a
few work sessions over two days. For the complete details see: Bottom
Repair. If the area is in the bright finished / clear area, a much more
difficult task is at hand. Matching the repair to the surrounding wood is a
very difficult task. The wood will have changed color over time and will continue
to do so. Getting a color match is difficult and having it stay matched is also
an issue.
The fiberglass covering protects against most dents and dings in a manner far superior to a varnish only finish. If the surface is hit hard enough, the wood may dent to such a degree that the fiberglass will delaminate. with reasonable size areas. The fiberglass can be re-adhered and much of the dent disguised by filling the void with new coating epoxy. The degree of invisibility of the final repair depends largely on how successfully the epoxy can penetrate the minute fissures at the edges of the damaged area. While it is always possible to remove the delaminated portion and sand back the edges to sound material, the color (and texture) match will be terrible. Think the sanding as adding a color mismatched halo around the repair to highlight it!
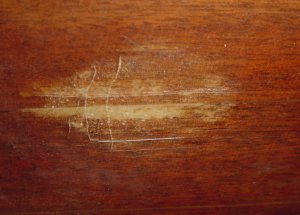
This photo shows a dent in the side of the hull resulting from our boat bumping against a pontoon boat. This was due to a wake from a large boat passed by far too close. You can see the partial delamination of the fiberglass from the hull and some stress cracks in the fiberglass.
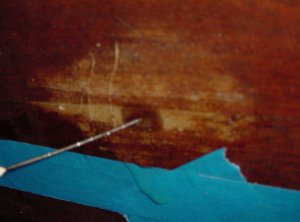
Depending on the shape of the area to be repaired, you may want to either slit the fiberglass along the top of the damaged area or drill tiny holes. The biggest problem in either case is to ensure that you do not damage the wood underneath. The fresh scratch marks from the cut or drill divots in the wood will be highlighted by the epoxy. Conversely the properly filled holes or slits in the fiberglass will be nearly completely invisible. To drill use a high speed portable grinder such as a Dremel tool and a tiny drill bit. The best source for tiny drill bits is to buy the sets of resharpened used carbide milling bits used for electronic printed circuit board production. These are available from woodworking and hobby suppliers for well under $1 per bit. I have bought them for as little as 10 cents each. These bits are very sharp, short and stiff. With normal drill bits (and small ones are expensive), the bit will flex and wander prior to snapping. The carbide bits allow more control and can even be used for routing small slits (but be VERY careful). The carbide is brittle and when it snaps, tiny pieces go everywhere, so wearing eye protection is absolutely required.
Make up very small batches of epoxy. You want to use very fresh warm resin which will flow out nicely. After even 5 minutes the heat from your hands will significantly reduce the flow characteristics of the resin. Adding 2-5% MEK or acetone will reduce the viscosity as well, but I have not tried this yet (I keep forgetting until the resin starts to thicken).
To apply the epoxy resin to the repair area, a brush will simply not work. The resin needs to be worked into all of the cracks and crevices without further lifting the fiberglass. It is very easy to apply too much pressure and enlarge the area that needs repair. A syringe and needle work very well with either holes or a slit for access. A very thin plastic spatula (cut from a thin piece of plastic such as a deli container lid) is useful for working the resin into wider areas. A 5-10 cc syringe is as large as you will need. 18-21 gauge needles are appropriate in size. Note that normal medical needles have too sharp of a point. Either get needles designed for glue application or hone the medical needles to a nearly blunt tip. Medical needles of appropriate size can be obtained through veterinary supply. Luer lock tips are great as this reduces the chance of the needle coming off when squeezing in the epoxy.
Apply the resin with the syringe. "Pump" the repaired area to get the epoxy distributed as well as possible. Once the area is filled and bubbles are removed, tape the openings. On a vertical repair, start taping from the bottom and working your way up. Adding more or wiping over-filled epoxy back into the repair will also help prevent bubbles. Even if it seems that the epoxy is staying in place, tape it anyway. It has a strong tendency to flow out of the repair after you have cleaned up and walked away.
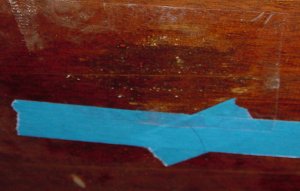
In some cases, it may be better to open a flap.This is where there is a diffuse hazy appearance and no amount of pumping seems to force the epoxy into the repair edges. You can open up the flap with a razor knife and use the blade as a thin spatula to work the epoxy in. This method is dangerous as you can quickly enlarge the repair area and end up chasing an edge that never wants to fill. If you open a flap, have an assistant mix a thinned batch of fresh epoxy. The 10-20 minute old stuff will just not flow properly. Cutting across the grain may result in fibers that remain visible once the epoxy sets or if you cut through and scratch the wood, the scratch will remain visible. Consider the trade off of the scratch, vs. the haze. This photo shows the patched area covered with packing tape. This allows you to see any remaining bubbles.
For some reason, this repair came out slightly darker than the surrounding area. I am not sure why, but it is still a big improvement over the original dent.
Once the epoxy has set (6-8 hours), remove the tape and scrape the repair flush. For a drilled repair, the only remaining step is to touch up the varnish.
If there are unwetted epoxy ends (from lifting a flap), grind them out and fill with fresh resin and tape over. This will usually render them invisible. After scraping everything flush look at the repair area and make sure that you have not exposed fibers. If so, you will need to recoat that area, scrape and sand. Then recoat the varnish.